
So over the weekend I had some time to indulge in some prime foodiness, among the highest orders of such that I am capable.
Chaga Spruce Mead
I began on Friday night, when I went to the spring to gather some water. While I was there, I saw thousands of fireflies in the field across from the spring — by far the most I’d ever seen in Maine. That place always feels magical to me when I go. Some places are just like that…. Glastonbury Tor is another (I took the main photo at the top of this website when I visited there in 2005). When I returned home with with a lot of gorgeous spring water, I put on 3 gallons of chaga tea. This requires a slow simmer for about 12 hours, and produces a wonderfully rich tea that looks like coffee.

At the very end of the simmer, I put in some freshly-harvested spruce tips, let it steep for about 30 minutes, and then let it cool overnight. The next day I mixed it with honey, pitched the yeast, put it into the carboy, and now it is happily bubbling away.
I have had more people tell me that my spruce mead is the best mead they’ve ever had than any other brew I’ve done. It’s not my personal favorite, but there is no question it has a magic to it that is palpable. Perhaps it is because much of the flavor comes from my own immediate ecosystem, namely the spruce trees in my yard.
There is a full writeup over at BardicBrews.net.
Rocking the Ribs
It’s funny. I spent nearly 20 years as a vegetarian, many of those as a vegan, and some as a raw vegan. These days I’m more about eating the best quality local food I can. Since I’m cooking meat again these days, I finally got a Weber kettle charcoal grill last year and have been learning how to use it well. I finally feel like I’m starting to achieve some mastery with it.
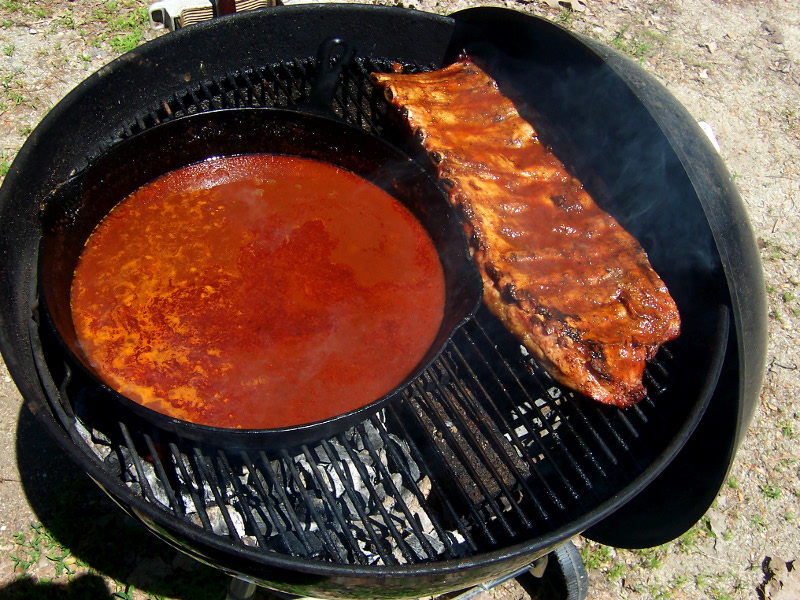
I haven’t made ribs all that often, but this batch I made was really good. I’m sure I’ll make them again, regularly. I started by setting up the grill for indirect heat, basically dividing the bottom half of the grill with bricks, so that the charcoal stays on one side. This allows me to do indirect heating, treating the grill basically like an oven for cooking. For those curious about how I cooked these ribs, here’s a rundown:
- First, I prepped the ribs by peeling off the membrane and applying a rub. The rub I used is DIY, is a mixture of a lot of spices (salt, pepper, garlic, chili powder, a bit of cinnamon, cumin, and who knows what else, it’s different every time). I put the rub on a couple of hours before starting the fire.
- Then, I started the fire using 1 chimney of charcoal, with another half-chimney full of unlit charcoal already in the grill. When the chimney was lit I put it into the grill, put on the lid, and opened the airvents so the grill would heat up and stabilize. I restricted the airflow to get about a 300 degree fire to start with.
-
Almost done…. While the charcoal was starting, I made a homemade barbecue sauce in my old cast iron skillet that belonged to my grandmother. I began by sauteeing a diced onion, then added salt, pepper, garlic, molasses, cayenne-infused honey, vinegar, a handful of raisins, and enough water to fill the pan about halfway.
- I then brought the rib rack and the skillet full of sauce outside. I seared the rib rack on both sides, then moved over to the indirect heat side. Then I added a chunk of dried apple wood from the tree in the yard for the flavorful smoke, put the skillet back on directly over the fire, and covered it up.
- Every half hour, I opened the grill to baste the ribs, and if necessary add more water to the reducing sauce, so it wouldn’t scorch and would keep cooking down. Every other time I opened the grill, I also flipped over the rib rack.
-

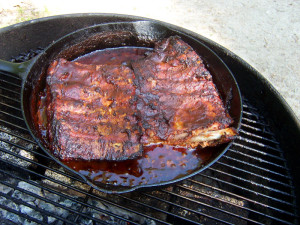
Ribs ready to serve. I did not use foil to cover the ribs as many do. I found that by keeping the air in the grill moist from the simmering sauce, the ribs don’t dry out.
- About 3 hours in, the outside of the ribs was perfect, so I cut the rack in half and put both halves in the skillet with the sauce, and moved everything to the indirect side.
- After another 30-45 minutes, it was ready, so I cut the ribs into pieces.


All in all it was one of the best grills I’ve done yet. It came out perfectly.
In other news….
Writing has slowed down a bit, but I will publish my next article over at Gods&Radicals next week. The trend of seriously awesome writing over there has continued as of late…. check it out if you haven’t.